Usage#
PyVista has an interface for placing plots in pyvistaqt that extends the
functionality of the QVTKRenderWindowInteractor class.
The pyvistaqt.QtInteractor class allows you to have the same functionality
of the Plotter class within a Qt application.
This simplifies adding meshes, updating, and controlling them when using
Qt.
Warning
Please do keep in mind that the BackgroundPlotter does not create its
own event loop by default. By design, the plotter will look for an
active instance of QApplication instead. So in the end, it is up to the
user to manage this event loop and there are several ways to achieve this.
For example, it’s possible to start Python interactively with python -i,
use ipython or execute the Qt event loop by adding plotter.app.exec_()
to the end of the following code.
Background Plotting#
Normal PyVista plotting windows exhibit blocking behavior, but it is possible
to plot in the background and update the plotter in real-time using the
BackgroundPlotter object. This requires pyvistaqt, but otherwise appears
and functions like a normal PyVista Plotter instance. For example:
import pyvista as pv
from pyvistaqt import BackgroundPlotter

sphere = pv.Sphere()

plotter = BackgroundPlotter()
plotter.add_mesh(sphere)

# can now operate on the sphere and have it updated in the background
sphere.points *= 0.5
Multiple Plotters#
The following example shows how to use an interface with multiple plotters. Each
plotter can be selected and functions like a normal PyVista Plotter instance:
import pyvista as pv
from pyvistaqt import MultiPlotter

mp = MultiPlotter(nrows=2, ncols=2)
mp[0, 0].add_mesh(pv.Sphere())
mp[0, 1].add_mesh(pv.Cylinder())
mp[1, 0].add_mesh(pv.Cube())
mp[1, 1].add_mesh(pv.Cone())
Example PyQt5 PyVista QtInteractor#
The following example shows how to create a simple application that adds a sphere to an empty plotting window.
import sys

# Setting the Qt bindings for QtPy
import os
os.environ["QT_API"] = "pyqt5"

from qtpy import QtWidgets

import numpy as np

import pyvista as pv
from pyvistaqt import QtInteractor, MainWindow

class MyMainWindow(MainWindow):

    def __init__(self, parent=None, show=True):
        QtWidgets.QMainWindow.__init__(self, parent)

        # create the frame
        self.frame = QtWidgets.QFrame()
        vlayout = QtWidgets.QVBoxLayout()

        # add the pyvista interactor object
        self.plotter = QtInteractor(self.frame)
        vlayout.addWidget(self.plotter.interactor)
        self.signal_close.connect(self.plotter.close)

        self.frame.setLayout(vlayout)
        self.setCentralWidget(self.frame)

        # simple menu to demo functions
        mainMenu = self.menuBar()
        fileMenu = mainMenu.addMenu('File')
        exitButton = QtWidgets.QAction('Exit', self)
        exitButton.setShortcut('Ctrl+Q')
        exitButton.triggered.connect(self.close)
        fileMenu.addAction(exitButton)

        # allow adding a sphere
        meshMenu = mainMenu.addMenu('Mesh')
        self.add_sphere_action = QtWidgets.QAction('Add Sphere', self)
        self.add_sphere_action.triggered.connect(self.add_sphere)
        meshMenu.addAction(self.add_sphere_action)

        if show:
            self.show()

    def add_sphere(self):
        """ add a sphere to the pyqt frame """
        sphere = pv.Sphere()
        self.plotter.add_mesh(sphere, show_edges=True)
        self.plotter.reset_camera()


if __name__ == '__main__':
    app = QtWidgets.QApplication(sys.argv)
    window = MyMainWindow()
    sys.exit(app.exec_())
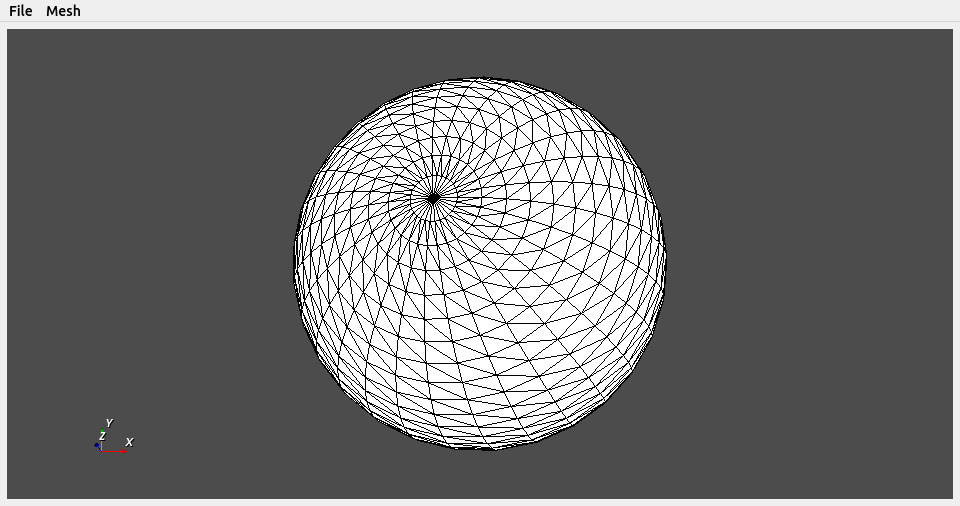
PyQt5 pyvista QtInteractor#
Using Different Qt bindings#
To use different Qt bindings you must first install them. For example, to use PySide6, you install it via:
pip install PySide6
Then you set the QT_API value to the specific binding you would
like to use:
os.environ["QT_API"] = "pyside6"
Please refer to the *QtPy* documentation page for more information.